
Installing New Mirrors and Windshields

When it comes to vehicle maintenance, ensuring that both mirrors and windshields are properly installed is critical for safety and functionality. These components not only contribute to the overall aesthetic appeal of your vehicle but also play a vital role in providing visibility and protection on the road. This guide aims to simplify the installation process for both mirrors and windshields, equipping you with the knowledge to tackle these tasks confidently.
Installing mirrors may seem straightforward, but the proper methods and techniques can greatly influence their durability and effectiveness. From choosing the right type of mirror for your vehicle to understanding the tools needed for installation, this article will walk you through each step. Similarly, the windshield is a crucial barrier against the elements, and its installation requires precision and care to ensure a secure fit that can withstand the rigors of driving.
By following this guide, you will gain insight into the best practices for installing mirrors and windshields, all while understanding the significance of each component in maintaining your vehicle’s integrity. Whether you’re a seasoned mechanic or a DIY enthusiast, the information provided here will enhance your skills and confidence in vehicle care.
Step-by-Step Process for Installing Car Mirrors
Installing car mirrors can improve visibility and enhance safety while driving. Follow this detailed procedure to ensure a correct and secure installation.
Step 1: Gather Necessary Tools and Materials
Before starting the installation, collect all required tools, which may include a screwdriver (flathead and Phillips), socket wrench, and adhesive if necessary. Ensure you have the replacement mirrors ready for installation.
Step 2: Remove the Old Mirrors
Begin by locating the screws or bolts that secure the old mirrors in place. Carefully unscrew them using the appropriate tool. If your mirrors are attached with adhesive, gently pry them off using the flathead screwdriver. Take caution not to damage the door panel or surrounding area.
Step 3: Clean the Mounting Surface
After removing the old mirrors, clean the surface where the new mirrors will be mounted. Use a cloth and a suitable cleaning solution to remove any debris, dirt, or old adhesive. A clean surface ensures a better fit and adhesion.
Step 4: Position the New Mirrors
Carefully align the replacement mirrors with the mounting holes. Make sure they are positioned correctly, taking into account any electrical connections if applicable. Confirm that they sit evenly and securely against the vehicle surface.
Step 5: Secure the New Mirrors
Once in position, insert screws or bolts through the mounting holes to secure the mirrors. If your mirrors use adhesive, apply it according to the manufacturer’s instructions before fixing the mirrors in place. Ensure that everything is tightened adequately but do not over-tighten, as this may crack the mounting area.
Step 6: Connect Electrical Components
If the mirrors include electrical features, such as heating or adjusting functions, connect the wiring harness according to the vehicle’s wiring diagram. Make sure the connections are secure and insulated to prevent any electrical issues.
Step 7: Test the Installation
Once everything is installed, test the mirrors for adjustments and electrical functions (if applicable). Ensure they are operational and properly aligned for optimal visibility.
Step 8: Final Inspection
Conduct a final inspection of the installed mirrors to verify that they are securely fastened and correctly positioned. Recheck all attachments and connections to ensure a safe driving experience.
Techniques for Proper Windscreen Replacement
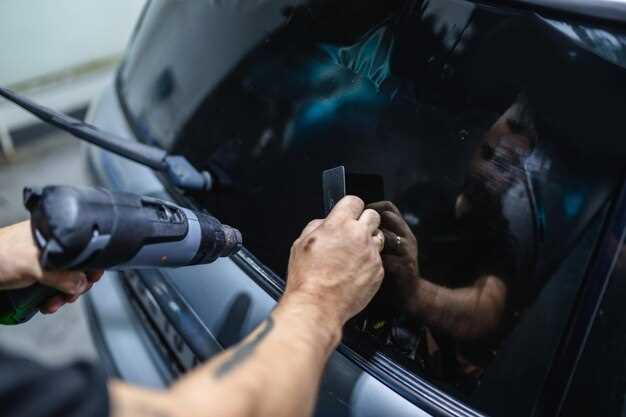
Replacing a windscreen involves careful attention to detail and adherence to best practices to ensure safety and durability. First, it is essential to use a high-quality windscreen that meets the manufacturer’s specifications for the specific vehicle model.
1. Gather Necessary Tools: Before beginning the replacement process, assemble the required tools, which typically include a windshield knife, suction cups, a caulking gun, and appropriate adhesive. Having everything at hand ensures a smoother workflow.
2. Prepare the Vehicle: Park the vehicle in a shaded area to prevent adhesives from curing too quickly due to heat. Additionally, remove any interior trim, wipers, and any other components obstructing access to the windscreen. This preparation allows for an unobstructed work environment.
3. Remove the Old Windscreen: Carefully cut through the urethane adhesive using the windshield knife. Utilize suction cups to handle the old windscreen safely. It is crucial to eliminate any debris or residual adhesive from the vehicle frame after the old windscreen is removed, ensuring a clean bonding surface for the new installation.
4. Apply Adhesive: Use a caulking gun to apply a uniform bead of urethane adhesive on the vehicle frame. Follow the manufacturer’s instructions regarding the recommended thickness and method of application. Proper adhesion is crucial for the integrity of the windscreen.
5. Install the New Windscreen: With the assistance of another person, position the new windscreen over the adhesive. Ensure that it aligns perfectly with the frame to prevent leaks and ensure proper sealing. Utilize suction cups for an accurate, controlled placement.
6. Secure and Cure: Press the windscreen firmly into place and check for any air bubbles or gaps that may require additional adhesive. Allow the adhesive to cure for the specified time before exposing the vehicle to water or stresses of driving conditions.
7. Reassemble and Test: Once the windscreen is securely installed and the adhesive has cured, reattach any previously removed components. Conduct a thorough inspection to ensure everything is correctly aligned and functioning before taking the vehicle on the road.
By following these techniques for proper windscreen replacement, you ensure not only a successful installation but also enhance the safety and aesthetic of your vehicle.
Common Pitfalls in Mirror and Windscreen Installation

Installing mirrors and windscreens may seem straightforward, but several common pitfalls can undermine the effectiveness and safety of these installations. Awareness of these issues can prevent costly mistakes and ensure a successful installation.
1. Inadequate Surface Preparation: One of the most critical steps in both mirror and windscreen installation is ensuring that the surface is clean and prepared. Dust, oil, or old adhesive residues can interfere with the bonding process. Always clean the area rigorously before applying adhesives or attaching components.
2. Using Incorrect Adhesive: Choosing the right adhesive is crucial. Different materials require specific adhesives to ensure a secure bond. For example, using silicone adhesive where a polyurethane sealant is needed can lead to failures. Always refer to manufacturer guidelines for the recommended products.
3. Misalignment Issues: Achieving proper alignment is essential, especially for windscreens, as misalignment can lead to poor visibility and increased wind noise. Use accurate tools to check alignment during installation. Take your time to ensure everything is positioned correctly before securing the components.
4. Neglecting Temperature Conditions: Temperature can significantly affect adhesive performance. Installing mirrors or windscreens in extreme cold or hot conditions can lead to improper bonding. Ideally, perform installations in a controlled environment to ensure optimal adhesive curing.
5. Over-tightening Fasteners: When securing mirrors or windscreens, it’s easy to over-tighten bolts or screws, risking cracks or breaks in the glass. Follow the manufacturer’s recommended torque specifications to prevent damage.
6. Ignoring Safety Precautions: Working with glass poses safety risks. Always wear protective gear such as gloves and goggles. Additionally, ensure that the workspace is free from hazards that could lead to accidents during installation.
By avoiding these common pitfalls, you can enhance the durability and safety of your mirror and windscreen installations. Taking the time to plan, prepare, and execute the installation process with care will yield the best results.